Biz Notes: The Facebook Dilemma, Part II

Almost two months ago I wrote a post about Facebook, and about the fact that I’m not on it. Truthfully, I mostly wrote the post for myself- I felt like I had a lot to get off my chest, and I knew coming forward with my feelings about the whole thing would bring relief. Writing that post did make me feel like a weight had been lifted, but what was even better was the amazing feedback I received from you all. To this day I still get comments and messages from readers about that post, expressing how refreshing it is to hear someone speak candidly about their challenges with Facebook and social media. It’s feedback like that, that is the greatest reward from this whole blogging thing.

But the Facebook saga continues. In that same post I also mentioned that though I didn’t feel the need to get back on Facebook for my personal life, I did foresee the need to get back on it for work in the near future. There are a few exciting changes going on behind the scenes at Channeling Contessa, all of which will be shared within the next few weeks. But what I can reveal now is that this little blog is growing- growing beyond me, growing in content, and growing beyond this space.  It’s also beginning to intertwine more and more with my business, which has been a personal goal of mine since the beginning. And with that growth comes a bigger online presence, which- you guessed it- means a Facebook fan page.

As silly as it sounds, the whole fan page thing is pretty daunting to me. Even worse, I fear it makes me come across as a hypocrite in relation to my previous post. I still don’t feel the need, nor want, to maintain a personal profile. The comparison trap is already something I’m worried about falling into with a fan page. But I know if I really want to grow, I need to get over those social media fears. And each day I become more proud of CC and my business, and what they’ve grown to be, so I figure I need to give myself a bit more credit, and really put myself out there.

So don’t be surprised if you see a new little icon pop up to the right sometime soon. And when it does, I would so, so, appreciate your support.

Photo Credit: Maxwell Jane Photography

Roasted Asparagus in a Creamy Caper Vinaigrette
Last weekend my younger brother graduated from college (congrats, Ted!), and my family had a great time ringing in all his accomplishments. On Saturday evening, following the graduation, we had an amazing meal at Chez Pascal in Providence, RI. Having not spent much time in Providence, we weren’t sure of what kind of food to expect, but we were completely blown away. Every single dish, as well as the service, was impeccable.  To begin the evening my mom and I both started with an appetizer of roasted asparagus tossed in a creamy caper vinaigrette.  The flavors profile of the dish was so good, I was eager to recreate it at home.

Here’s the break down: asparagus gets briefly roasted at 400° until it’s just cooked through.  Then, after it cools, it’s tossed in a three ingredient caper vinaigrette and topped with toasted pine nuts.  This salad is perfect for entertaining because it’s served at room temperature. You could also amp up the protein and serve it for brunch or lunch by topping it with diced hard boiled egg.

You guys, I’m really quite a fan of this dish. I know it’s vegetables and not a cupcake, but I highly urge you to embrace asparagus season and get on board with this dish.  Enjoy!

Roasted Asparagus with Creamy Caper Vinaigrette

Makes 4 side portions

  • 2 lbs fresh asparagus, trimmed
  • 1/3 cup mayo or greek yogurt
  • 1 T chopped capers
  • 1 T white wine vinegar
  • 1/4 tsp black pepper
  • 1/3 cup pine nuts
  • 1 T olive oil
  • 1/2 tsp salt

Preheat the oven to 400°. Place the asparagus in a single row on a lined baking sheet.  Drizzle over the olive oil, sprinkle on the salt, and roast for 10-12 minutes until just al denté.

While the asparagus cooks, place the pine nuts in a small frying pan and cook over low heat until nicely browned and fragrant. Whisk together mayo or yogurt, capers, vinegar, and pepper.

Once the asparagus has cooled toss in the vinaigrette and top with the toasted pine nuts. Serve immediately.

Pasta with Mussels in White Wine

Right after college I moved to DC. It wasn’t exactly part of the plan. The plan was to move to New York and get an apartment with two of my closest friends from college. But as often happens when one makes plans- the plans change.  For me it was a guy.  Thankfully it’s still the same guy! But yes, I moved to DC, not New York, for the guy I was seeing. I never thought I would be the kind of person to make such a major move for someone else, but truthfully, it didn’t seem like such a big deal at the time. I had gone to college in Baltimore which was only an hour away, and I already had some great friends in DC. What was so different?

It was different, and it was hard in the beginning. Even though I had great friends in DC, I had a lot of great friends in New York that I missed terribly for those four years. Though another one of the girls in the original apartment plan decide to head in another direction than NYC, too, the third was still headed there and there was always a little part of me that felt like I had let her down for not moving, too. I know, now, she doesn’t feel that way, it was just hard at the time. So even though I’m experiencing the opposite now, and missing all of the great friends I left down in DC, I’m really happy to be able to play catch up with all the ones in NYC and hopefully make up slightly for the past four years.

Instead of being four hours away I’m now a mere two blocks from the third in our apartment group. What’s better? She shares my love of cooking and the Contessa. She is the master mind behind this recipe. After a dinner feast earlier this week which resulted in way too many leftover mussels, she suggested I make a sauce to put over pasta (and share it with you all!). So make a sauce I did. Though you could make the mussels, and then make the sauce, I recommend doing what we did. Make more mussels than you can eat and then use the leftovers the next day. You’ll get two incredible meals out of one, and the flavor of the sauce will be that much richer after the mussels have rested overnight.

And with that I am off to Toronto for the weekend! Sadly it involves more work than play, but I’m hoping to take advantage of all the great food in the city while I’m there. If you have any recommendations, send them my way. Have a wonderful long weekend!

 Pasta with Mussels in White Wine adapted from Ina Garten’s Barefoot in Paris

  • 1 lb short cut pasta- penne, rigatoni, gemmelli, etc
  • 6 pounds mussels
  • 1/3 cup all-purpose flour
  • 4 tablespoons unsalted butter
  • 4 tablespoons good olive oil
  • 2 cups chopped shallots (12 to 15 shallots)
  • 4 tablespoons minced garlic (6 to 8 cloves)
  • 1  14 oz can diced tomatoes
  • 1 teaspoon good saffron threads
  • 1/2 cup chopped flat-leaf parsley
  • 2 tablespoons fresh thyme leaves
  • 2 cup good white wine
  • 3 teaspoons kosher salt
  • 1 teaspoon freshly ground black pepper
  • 1 cup grated parmesan

Make the mussels according to the Contessa’s directions. I doubled the mussel recipe (as reflected in the ingredient list above), ate half for dinner with friends, and then used  the other half for the pasta sauce. I recommend doing that, as you really need to mussels to cool completely before you can easily remove them from their shells. Whatever amount of mussels you use- make the full amount of sauce, you’ll need it for the pasta!

After the mussels have cooled, remove them from their shells. Place the mussels and sauce in a large frying pan and place over medium low heat. Cook for 30 minutes, stirring occasionally, until the sauce has cooked down and thicken. Season with salt and pepper to taste.  If your sauce seems thin you can add in more white wine or chicken broth.

Meanwhile, cook your pasta according to the package directions.

Once the pasta is cooked, drain and add directly to the mussels. Stir until well coated. Toss in the parmesan and stir until well combined (the sauce should have a silky sheen).  Sprinkle with additional parsley and herbs and serve immediately.


Biz Notes: Business with Intention- The Video!

As you may or may not know, a few months back I partnered with Jess Constable of Make Under My Life to launch the Business with Intention workshop. We created a video for the first workshop in Chicago, and I’m so excited to share it with you all today! Not gonna lie, it’s a little scary seeing myself speak on camera but I’m choosing to be brave and put it all out there. So here goes- hope you enjoy it!


Kitchen Shelves, Styled

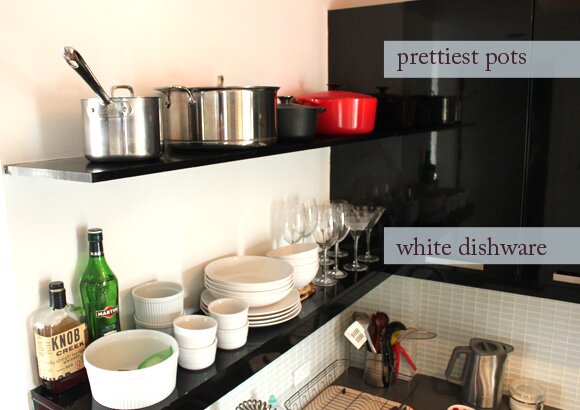
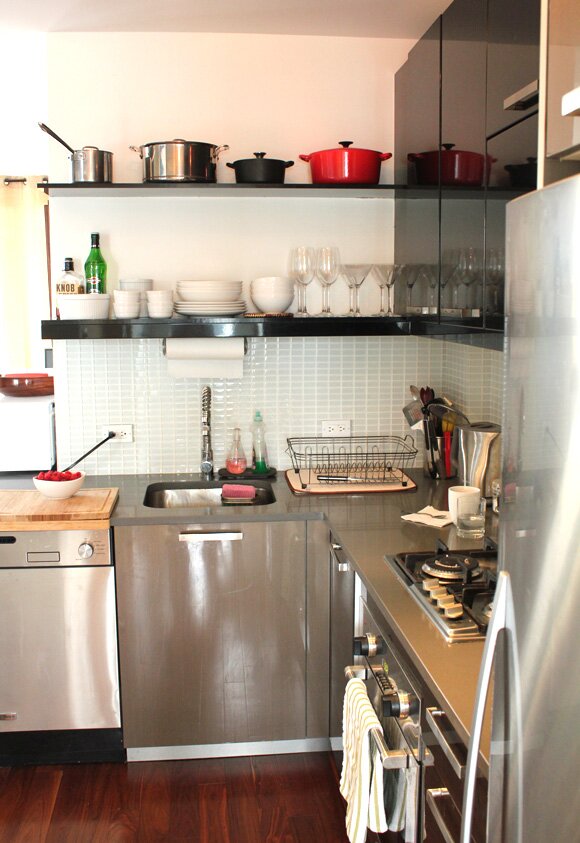
When I first viewed the apartment we’re currently living in, one of the biggest selling points (for me) was the open shelving in the kitchen. For years I had dreamed of big open shelves where I could display my favorite dishes, pots, and glassware. I also loved the idea of having items at arm’s length, to make preparing dinner or entertaining that much easier. I messed around for the first few months we were here, trying dishes and pots in different places or at varying heights, but I’ve finally settled on a look I love so I thought I would share. I’ve also included a few pics of my actual kitchen since a few of you have asked me to do that. Here’s the breakdown!

  • The shelves themselves are broken down into two sections- pots and dishware. I keep frying pans and a few additional pots in the cupboard, but I keep my best ones displayed on the top shelf. Similarly, I have more dishware in the cupboards but like to keep all the white pieces on the bottom shelf. The white pairs nicely with the black shelves and provides a clean look.
  • I keep a handful of glassware at the far end.  Truthfully we don’t use those glasses often but they’re too pretty to keep tucked away in a cupboard so I like to have them out.
  • At the near end we always have a few bottles of liquor or wine, and though it’s not full right now- the white bowl houses things like onions, garlic, and shallots.

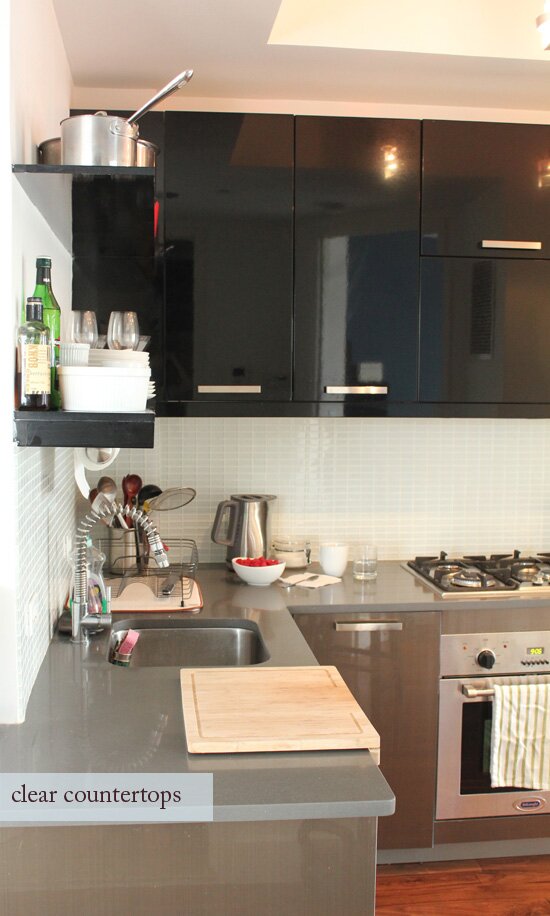
Here is a side view of the shelves, which provides a more full view of the kitchen. Though we have a pretty large kitchen by NYC standards, I am very strict about keeping our countertops as clear as possible so I have room to work. I also really love our sea glass back splash, so I like it to be as visible as possible.

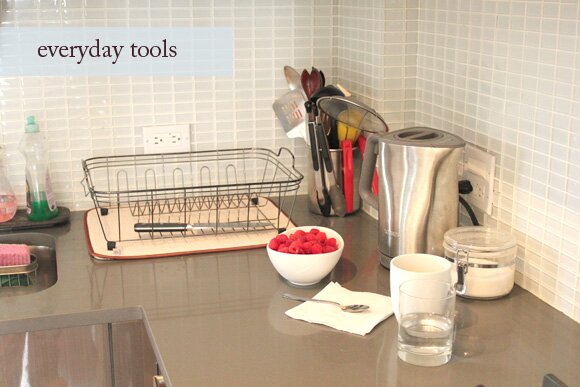
This little corner of the kitchen is where I usually stand. I’m near the sink, stove, and all my tools simultaneously. I keep the majority of my kitchen tools stored in a stainless steel holder that lives on my counter. While you see a bit of my breakfast here, the only items that are kept there constantly are the electric kettle, which we use for tea and cooking all the time, and the sugar. All other spices and condiments are kept in the cupboard.

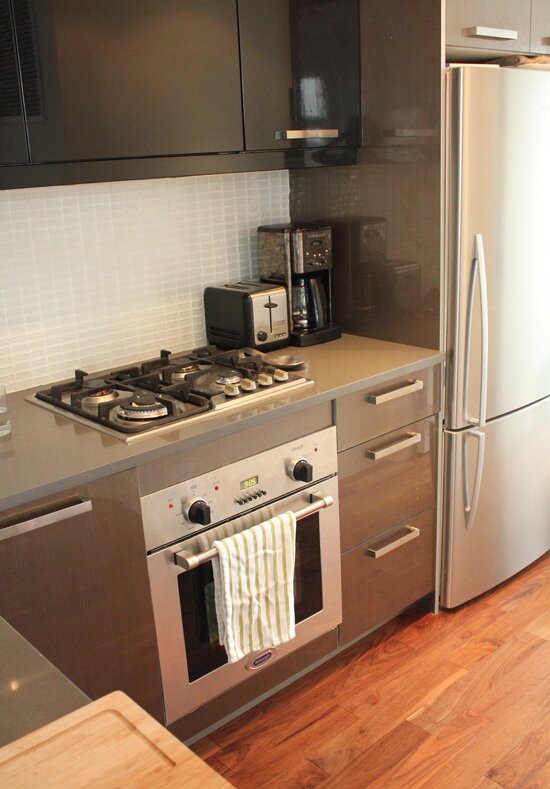
These two remaining photos provide you with a more complete view of the entire space. I took these photos in the morning- I love all the natural light our kitchen gets. I’m also a big fan of the floors. I used to keep a mat in the kitchen space but one day decided to just get rid of it as the floors seemed to nice to keep covered up.

That’s about it for my little kitchen- I hope you enjoyed it!


Beach Ready

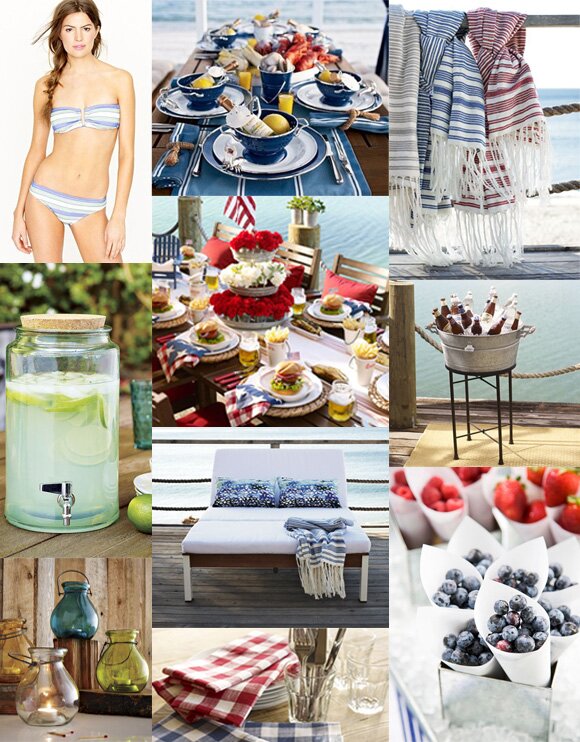
Hello friends! And happy Monday. I don’t know about you, but I woke up to dark skies and lots of rain, so it looks like a day tucked inside plugging away is what’s on tap for my Monday. But it’s simultaneously making me crave summer and time at the shore that much more. With Memorial Day just around the corner, it seemed like the perfect opportunity to round up some of my top beach pics for whipping up a feast on the beach or just basking in the sun. Now’s all I need is a beach house….

Image sources (from the top left) : swim suit, clam bake, beach blankets, lemonade carafe, Memorial day feast, drink cooler, lounger, glass lanterns, gingham napkins, berry cones 

Biz Notes: Just Keep Going

Wooooh sorry for the delay here friends on today’s post! When I started thinking earlier this week about what I wanted to write for this week’s Biz Notes addition I was a little stumped. I had a couple ideas floating around in my head, but nothing that really stuck out.

I got up this morning and checked my email and sadly, the answer to this week’s post was sitting in my inbox. I say sadly because, well, a client fell through. Yep. Fell through. Completely. And it was out of nowhere- nowhere as in we had a launch call scheduled for today. I know this is par for the course. This is all part of what I’m doing- what I signed up for- and what I need to learn to deal with. But it doesn’t make the sting of that first one any less hard. Truthfully, the hard part has hardly anything to do with the client (thankfully the reason the project fell through was completely out of my control), and more to do with the challenge of picking myself up, moving on, and convincing myself to just keep going. It’s scary!

After the initial shock of this morning’s events wore off a little, I was able to step back a bit and reflect. Did this loss make me a complete failure? No. Did I still have work to keep me busy? Yes. Wouldn’t this change in my schedule free up the time I was craving to focus on all the other projects I wanted to pursue? Yes! Was I at a complete loss for ways I could continue to grow my business? Hardly. Despite this loss, do I still want to be doing what I’m doing? Honestly, if you had asked me that up until about 2 pm today, I might have said no. But after I had some time to let the situation settle in and I started thinking about all that I’ve already accomplished and all the great things to come- I still have to say yes. Yes, I want this business, and yes, I’m willing to work really really hard for it. So with that, in the words of Jess Constable, I’m just going to keep going.

Photo Credit

Orange Scented Cream Cheese Pound Cake

I have a thing for cream cheese. I never tire of it slathered all over a hot toasty bagel or used as the main ingredient in frosting, but what I really love is weaving cream cheese into recipes where you wouldn’t think to put it- like mashed potatoes, Mexican food, and even soup from time to time. So when I saw a recipe for Cream Cheese Pound Cake in Joy’s new cookbook, I knew it would be right up my alley. In a dessert, I think cream cheese begs for a little citrus, so I added in the zest of one Tangelo orange (you could use any type of orange). I loved the addition but you could certainly make it without.

Despite how simple this dessert is, it’s really a gorgeous cake-from the velvety batter to the way it rises and develops a deep brown crust, while still remaining unbelievably moist on the inside. For that reason, I’m going to suggest not putting anything on it. No jam or nutella or whipped cream- this cake deserves to stand on it’s own. It is that good.  Enjoy!

Orange Scented Cream Cheese Pound Cake slightly adapted from the Joy the Baker Cookbook

Makes one 9×5″ loaf

  • 1 8 oz package cream cheese, softened
  • 1 1/2 sticks unsalted butter, softened
  • 2 cups all purpose flour
  • 1/2 tsp salt
  • 1 1/2 tsp baking powder
  • zest of 1 orange
  • 2 tsp vanilla extract
  • 1 1/2 cups sugar
  • 4 eggs at room temperature

Set your rack to the middle of the oven and preheat to 325°. Grease and flour a 9×5 inch loaf pan and set aside.

Whisk together the flour, salt, and baking power- set aside.

In a stand mixer fitted with the paddle attachment, beat the cream cheese on medium low speed until soft and pliable. Add in the butter and sugar and beat until light and fluffy- approximately 3 minutes. Add in the vanilla, stir until blended. Then add in the eggs one at a time, beating for one minute after each addition.  Stop the mixer and scrape down the sides of the bowl if necessary.

With the mixer on low, add in the dry ingredients in two batches and beat until just incorporated. Finish mixing the batter by hand with a rubber spatula. Pour the batter into the prepared and bake for 30 minutes. After 3o minutes rotate the pan and cook for an additional 30-35 minutes until a skewer inserted into the center of the cake comes out clean. Cake can be stored up to 4 days after baking in an air tight container.

Brooklyn Botanical Gardens

I’m really craving time outside these days. I know it’s spring, and that’s what we’re supposed to feel, but I find if I spend a solid amount of time outside on the weekends it makes such a difference in my work week. It makes me feel much more ready (and even excited!) to take on the week. Do you ever feel that way?

Last weekend Brandon and I visited the Brooklyn Botanical gardens. I hadn’t been since I was a little girl- it’s actually where I learned to walk as a baby! It was a gorgeous day and it felt so good to spend hours wandering in and out of the gardens, reading in the grass, and drinking lemonade. In fact, that is exactly how I would like to spend my entire summer.

For Your Weekend: Peach & Blueberry Smoothie

I made this smoothie (and took these pictures) last Sunday when we saw the first sunny skies after what felt like an eternity of grey ones. I decided to snap the photos on our patio since the outdoor light was so gorgeous. These photos also give you a little sneak peak into what my shoots actually look like.  I was at a friend’s apartment earlier this week and someone asked me where I shoot my photos, thinking I had some gorgeous space in my apartment. I wish! It’s usually on a cloth on my living room floor. Admittedly that was getting a little dull, so it’s a nice change of pace to be able to shoot outdoors.

Are you a smoothie drinker? I just started drinking them this winter when I was positively sick of the fruit selection in the store. I don’t eat too many frozen foods, but peach and berry season is so frustratingly short, I’ve really gotten into stocking up on the frozen variety. There’s something about the color of this smoothie that is so refreshing. Now that a new fruit season is right around the corner, I’m looking forward to making some smoothies using actual fresh fruit!

I hope you all have a wonderful Mother’s Day weekend! I’m so excited my mom’s coming to town and we get to have a proper celebration! See you next week. xx

Peach & Blueberry Smoothie

Serves 2

  • 1 cup frozen blueberries
  • 1 1/2 cups frozen peaches
  • 6 ice cubs
  • 1 cup water
  • 1 cup almond or soy milk, or orange juice
  • 1/4 cup greek yogurt
  • 1 T agave nectar (optional)

Place the first four ingredients in your blender and blend until smooth. Add in the yogurt and agave nectar if using and blend until just combined. Serve immediately.