Four years ago I made homemade pizza for the first time, meaning- I made the dough from scratch. That pizza was just ok. But I kept trying and four years later, homemade pizza now falls into the category of easy weeknight meals in our house and doesn’t involve a screaming match or two (permitted I have some dough already stowed in the freezer). I now love making pizza at home, and sometimes actually like my own more than delivery. Nothing beats fresh mozzarella!
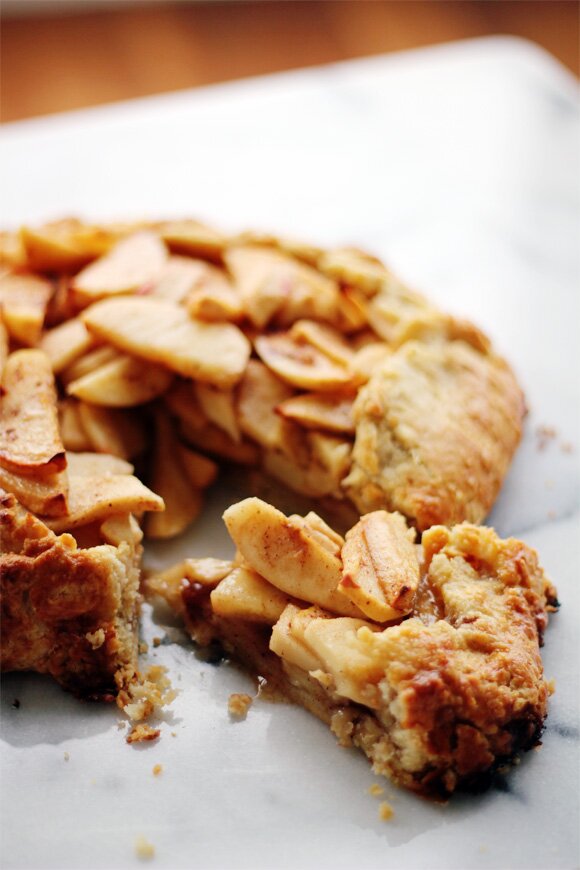
Pie and anything involving a pie like or pasty crust is my current pizza. I find it completely intimidating. But considering I’ve literally only made two pies and one crostata (including this one) in my entire life, it’s understandable that I have some work to do! I had an apple pie this weekend that was pretty much the best thing ever- so good it inspired me to put on my big girl pants, get over my fear of pie dough, and put the 20+ apples in our fridge to good use. I remembered this awesome guide I found on Food52 on how to put together a crostata this summer, and knew I had to use that. There was still a little dough wrestling in the process but the fact that a crostata is meant to look rustic makes the whole thing 10 times easier!
Ps: Also Salted Cider Caramel Apple Pie- a must add to your fall to make list.


Brow Sugar Apple Crostata adapted from Food52
For the crust (or use whatever crust recipe you’re comfortable with):
- 2 cups all purpose flour
- 1 tablespoon sugar
- 1/2 tsp salt
- 1 1/2 sticks unsalted butter, chilled and cut into small cubes
- 1/3 ice water, plus more if needed
- 1 egg plus a little water beaten for the egg wash
The thing I work hardest to do when making pie dough is to keep everything really cold. I’ll measure the dry ingredients then stick them in the fridge to chill. I’ll cut the butter then stick it in the freezer for 10 minutes to get even colder, and so on and so forth. I also make my pie dough by hand, mostly because I don’t have a big enough Cuisinart, but feel free to use a Cuisinart if you have one.
To do by hand: In a large bowl mix together the dry ingredients. Add in the chilled butter and using your hands, break up the butter into small pieces. The smallest piece of butter should be no smaller than a pea- but you should have larger pieces as well. Continue to do this until the mixture resembles large crumbs. Pour in the ice water and bring the dough together until it forms a loose ball. Add more water, a tablespoon at a time, if your dough seems too dry. Wrap the dough tightly in plastic wrap and place in the fridge for at least one hour before rolling out. Let dough come to room temp for 10 minutes before rolling out.
For the apple mixture:
- about five small to medium apples crisp, tart apples peeled and thinly sliced (I like Crispin, Pink Lady, Honeycrisp, and Granny Smith)
- 1/3 cup brown sugar
- 1 tablespoon maple syrup
- 1 tablespoon corn starch
- 1 tsp cinnamon
- pinch of salt
- juice of half a lemon
Mix together all ingredients listed above and set aside.
Once dough is brought to room temp, roll out on a floured surface and transfer to a large rimmed baking sheet lined with parchment paper. Arrange the fruit on top, leaving about 1 1/2 inches clear around the edge of the dough. To fold the edges, fold the edge nearest to you toward the center. Rotate the galette and lift the adjacent piece of edge, and fold toward the center. The important part is really that there are no cracks where the juices will leak out during baking, so don’t worry if it looks “rustic” … it’s supposed to! Bake for 45 minutes to an hour or until a paring knife slices easily through the apples. NOTE: I was worried the exposed apples would burn, so I covered just the apples with an aluminum foil tent.